
Roblox Home Alone Complete Survival Walkthrough
Roblox News

Roblox Home Alone Complete Survival Walkthrough

Roblox Doris

Table of Contents

Game Basic Overview & Core Game Logic

Home Alone is a popular single-player horror experience available on Roblox. Unlike most short horror maps that rely purely on jump scares, it creates a tense overnight survival loop built around two critical goals. You must finish household chores to earn allowance money, while carefully identifying disguised paranormal entities knocking at your front door to preserve your sanity.

My personal take on this title is that it is far more than a basic horror escape experience. Its biggest strength comes from constant dual pressure: resource gathering paired with real-time threat evaluation. Most Roblox horror maps force players to follow fixed linear paths, but Home Alone requires you to continuously switch between completing chores and judging unknown visitors. It rewards observation and patience much more than fast reflexes. Failing either objective will lock you out of the perfect ending and trigger neutral or bad outcomes instead.

There is a strict losing condition built into the rules. If sanity drops to zero before 6 AM, anomalous entities will overwhelm you and end the run. Even if you stay mentally stable all night, you still cannot achieve the best ending if you do not earn enough money from chores. This dual scoring system makes every decision throughout the night carry lasting consequences.

Pre-Game Core Mechanism Explanation

Sanity Value System & Recovery Items

Sanity is your most vital survival resource. Accidentally opening the door for an anomaly deals heavy sanity damage. Sudden environmental jump scares also chip away at your mental stability. Once sanity hits zero, you immediately receive the bad ending.

You can purchase several restorative items including dolls, rubber ducks, candles, and soda, each offering different amounts of sanity recovery. Many new players overlook this system entirely during their first playthrough. In my experience, buying affordable recovery supplies early creates a vital safety buffer for the dangerous late-night phase and drastically reduces game over risks.

Visitor Identification Tools & Safe Rejection Method

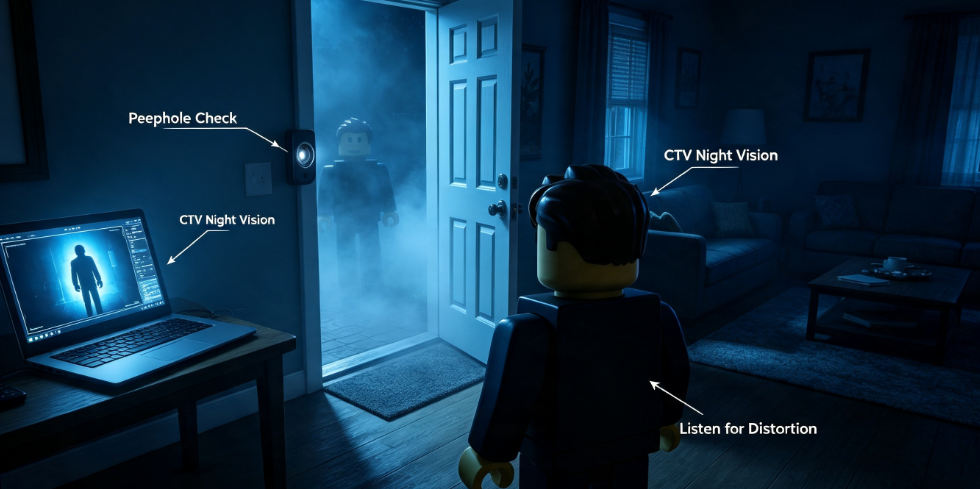
Visitors randomly knock on your front door all night. Every visitor can be a normal human or a dangerous anomaly. You cannot trust dialogue alone. Three verification methods are available:

  • Peephole: Quick preliminary visual check of the visitor’s appearance
  • Laptop CCTV Night Vision: The most reliable tool, revealing distorted bodies, warped faces and visual glitches impossible to spot otherwise

Voice Audio: Anomalies often speak with unnatural, distorted tones

One widely overlooked mechanic is the front porch light. When you confirm a visitor is an anomaly, simply turn off the porch light to drive them away safely without opening the front door. Beginners frequently risk opening the door to investigate, which often causes permanent sanity loss. If multiple clues suggest suspicious behavior, always use the light to reject instead of interacting directly.

Chores & Money Earning Rules

All available chores are listed on the indoor task board, each granting a fixed cash reward. You need roughly $160–$180 total allowance to unlock the perfect ending. You also earn small cash bonuses each time you correctly identify and repel an anomaly, which can cover gaps if you fall behind on tasks.

I recommend tackling high-value chores early. Between midnight and 2 AM, visitor knocks are rare, giving you uninterrupted time to complete most valuable tasks. Saving important chores until midnight when knocks become constant forces you to split focus, increasing the chance you miss critical visitor warning signs.

Step-by-Step Night Survival Full Process

Early Night (00:00 – 02:00): Low Visitor Frequency, Focus on Chores

The opening two hours are the easiest segment. Only a small number of ordinary visitors appear, and their abnormal traits are obvious to spot. Spend this time traveling between rooms to finish tasks such as kitchen cleaning, window wiping and coffee preparation to build up your allowance fund.

Use surplus money from completed chores to buy low-cost sanity recovery supplies like candles and rubber ducks. Avoid wasting cash on decorative objects that offer no survival benefits.

Mid-Night (02:00 – 04:30): Peak Difficulty, Balance Chores & Visitor Checks

After 2 AM, knock frequency rises sharply, marking the hardest section of the game. You will encounter the full roster of visitors including the lost dog man, plumber, content creator child, police officer and firefighter, each with unique anomalous tells. For example, the normal dog owner has a real puppy visible in the yard on CCTV, while the anomaly version crawls on all fours in the backyard.

My most effective tactic for this phase: pause all chores immediately when you hear a knock. Do not rush to finish incomplete tasks, as haste causes you to skip CCTV screening. Follow your inspection routine thoroughly before making a decision. Disable the porch light to send away confirmed anomalies.

Late Night (04:30 – 06:00): High-Threat Anomalies, Sanity Preservation

The final hour before dawn is extremely dangerous. Rare high-risk anomalies with subtle hidden abnormalities begin appearing repeatedly. Random indoor jump scares also become more frequent to drain your sanity. Use the recovery items you stocked earlier to keep your mental stability safely above warning levels.

Limit long trips to remote upstairs rooms. Stay near the front door and laptop camera to respond quickly to knocks. Ignore low-value minor chores at this stage; only complete extra tasks if you still need more cash to hit your allowance target.

Final Countdown Before 6 AM

As dawn approaches, stop all active work and check two key metrics: total cash earned and current sanity. If you remain short on funds, rush to wrap up remaining high-value chores. If sanity is dangerously low, consume your stored recovery items to avoid a last-minute bad ending.

Three Different Endings Unlock Conditions & Plot Analysis

Three distinct endings exist, activated based on your overall nightly performance. Many casual players only unlock one ending on their first attempts and miss the full story content.

Perfect Good Ending: Survive until 6 AM, sanity never hits zero, and collect $160–$180 allowance. Your parents return, praise your responsibility, and reward you with full payment. This is the intended optimal completion path.

Neutral Ending: Maintain sanity all night and repel every anomaly, but fail to earn enough money from chores. Your parents acknowledge you stayed safe but remind you unfinished work means no full allowance.

Bad Ending: Sanity drops to zero from mistakenly admitting anomalies. Creatures break into the house, triggering a horror cutscene and immediate game failure.

From my perspective, this three-ending design creates a complete narrative loop. Safety and task completion are weighted equally. Most players stumble into the good ending without realizing they can intentionally alter playstyles to view the other two branches, significantly lowering the game’s replay potential.

Universal Survival Tips & Common New Player Mistakes

Standard Inspection Workflow For Every Knock

  1. Check the peephole for initial observations
  2. Activate laptop night vision CCTV for full visual inspection
  3. Listen closely for distorted visitor speech
  4. Turn off the porch light to reject if multiple abnormal signs appear

Top Costly Mistakes That Cause Failure

  • Opening the door without completing all three inspection steps
  • Ignoring sanity recovery supplies and lacking reserves for late night
  • Leaving high-value chores unfinished until midnight rush hour
  • Forgetting the porch light trick and risking direct interaction with suspicious visitors
  • Closing the CCTV camera after checking one visitor, losing live monitoring

Pro Tip: Never rush judgments when multiple visitors arrive in quick succession. Rushed decisions are the number one reason new players drain sanity and trigger the bad ending.

Hidden Collectibles & Secret Achievement Supplementary Content

Interactive hidden items are placed around every room. Finding them unlocks secret achievements, though they do not change main ending outcomes. These collectibles provide fragmented background lore explaining the origin of the anomalies and deepen the horror atmosphere.

For completion-focused players, hunt for collectibles while traveling between chore locations in the early night. Clearing the main objective first then backtracking wastes valuable survival time. Each ending also comes with its own exclusive achievement, requiring three separate playthroughs to fully unlock everything.

Comprehensive Game Evaluation & Personal Unique Views

Strengths

Most Roblox horror maps rely on predictable jump scares and linear progression. Home Alone differentiates itself with its innovative dual-goal system. The varied visitor roster features unique anomaly cues, so you cannot rely on simple memorization; consistent careful observation remains necessary across every run. The multiple ending system greatly boosts replayability.

Weaknesses

The sharp increase in knock frequency after midnight overwhelms new players, forcing them to juggle two competing priorities. Several anomalies have extremely subtle visual hints that are difficult for beginners to detect within limited inspection windows.

Recommended Play Order

  1. First run: Aim for the good ending to learn core mechanics and night-time rhythm
  2. Second run: Skip some chores while maintaining sanity to trigger the neutral ending
  3. Third run: Intentionally admit anomalies to drain sanity and unlock the bad ending

Roblox Home Alone Survival Guide • Complete Walkthrough & All Endings
Prev: Roblox Pet Simulator 99 Code Update: Sep 2024
Recommended Article
Roblox Pet Simulator 99 Code Update: Sep 2024
payment icon
Copyright© Buymmog.com all rights reserved.   This website is owned and operated by JINKING KAK LIMITED.
facebook twitter tiktok twitch instagram